A Complete Guide to Setting Up Your Home Studio for Professional Video Recording
In today’s digital age, appearing professional on video calls and recordings is essential. Whether you’re creating content, conducting business meetings, or simply want to look your best on Zoom, having the right equipment can make a significant difference. While I don’t publish videos of myself, I use podcast/streaming-quality equipment for my Zoom calls, which helps me appear more professional than using a laptop’s built-in microphone and camera. Here’s a detailed look at my setup, balancing cost and quality.
My Desk Setup
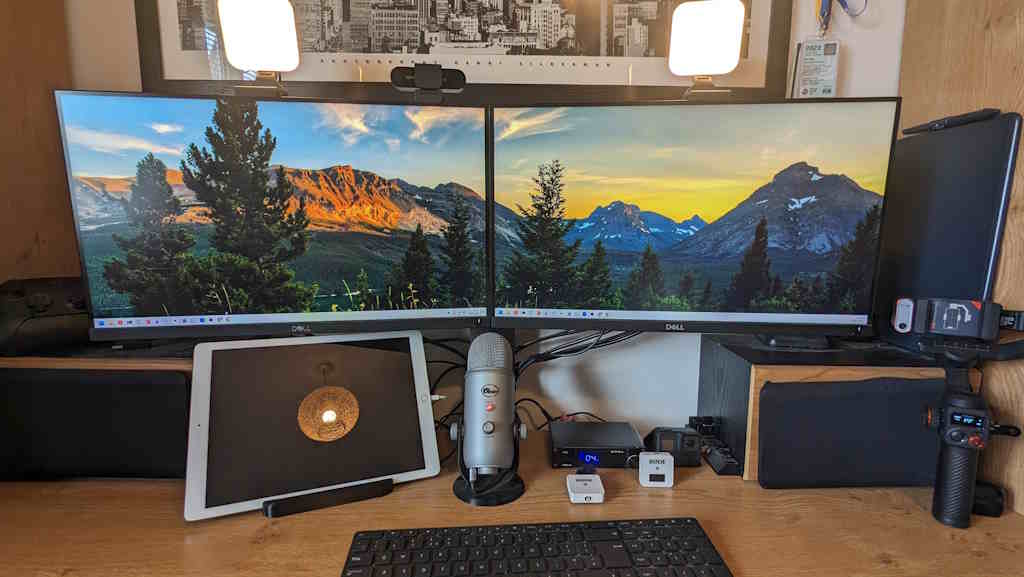
Here’s a snapshot of my desk setup, featuring most of the equipment discussed below:

Why Audio Matters Most
Before diving into the equipment, it’s crucial to understand the importance of audio. Poor audio quality can detract from your message, no matter how good your video looks. To understand why audio is so critical, check out this video.
Microphone: Logitech Blue Yeti
A high-quality microphone is essential for clear audio. I use the Logitech Blue Yeti, which is highly praised for podcasting. It’s available in several colors if you want it to be seen on camera:
The Blue Yeti offers excellent performance for its price point. For setup tips and reviews, check out these videos:
I use a custom 3D-printed microphone base to keep it out of the way of my screens but directly in front of me. Alternatively, you can mount it on a microphone arm like this one. You might also want a pop filter if the mic is close to you; here are some options.
Camera: Logitech Brio 4K
For video, I use the Logitech Brio 4K streaming camera, which offers great quality for its price. It has become more affordable recently due to the release of a newer model (the MX):
If you have a DSLR that allows streaming, this can provide even better quality with manual focus capabilities. For more on using a DSLR as a webcam, check out this guide.
Lighting: Logitech Litra Glow
Good lighting is crucial for professional-looking videos. I use two Logitech Litra Glow lights on both monitors to ensure consistent lighting without casting shadows on my face:
For review and setup ideas, watch this video.
Software: OBS (Open Broadcaster Software)
All of this equipment feeds into OBS (Open Broadcaster Software), a free open-source software I use to crop the view around me, hiding unwanted items and adding my logo to the feed. OBS can record or stream to platforms like Zoom.
Outdoor Recording
For outdoor recording, sound remains the priority. Here are some options:
- Wired Lavalier Mic: The Boya BY-M1 is a cost-effective choice, though it limits your range.
- Wireless Mic: The RØDE Wireless GO II offers more freedom, allowing recording up to 100 meters away from the camera.
Check out footage I shot using the Rode mic here. Note: Avoid the white version as it quickly becomes grubby.
Handheld Outdoor Recording
For handheld outdoor recording, a good gimbal is essential to keep your footage steady. I use the Hohem iSteady M6 with a tracking module:
Check out various bits of footage shot with the iSteady:
Setting up a professional-quality recording setup at home doesn’t have to break the bank. With the right equipment and a bit of know-how, you can significantly enhance the quality of your videos, whether for business or personal use.